ngrok brings a client's webhooks to your laptop, but lock the tunnel first
ngrok's replay feature only works if it stores every request and response in full. Turning it on is a decision about client data, not about tooling.

In brief
- ngrok brings a client's webhooks to a handler on your laptop, but Stripe describes this approach for testing only.
- An unauthenticated public URL can receive forged events, so combine IP filtering with signature checks.
- Replay in the Traffic Inspector needs Full Capture, which stores every request and response in full, so think twice when real data is involved.
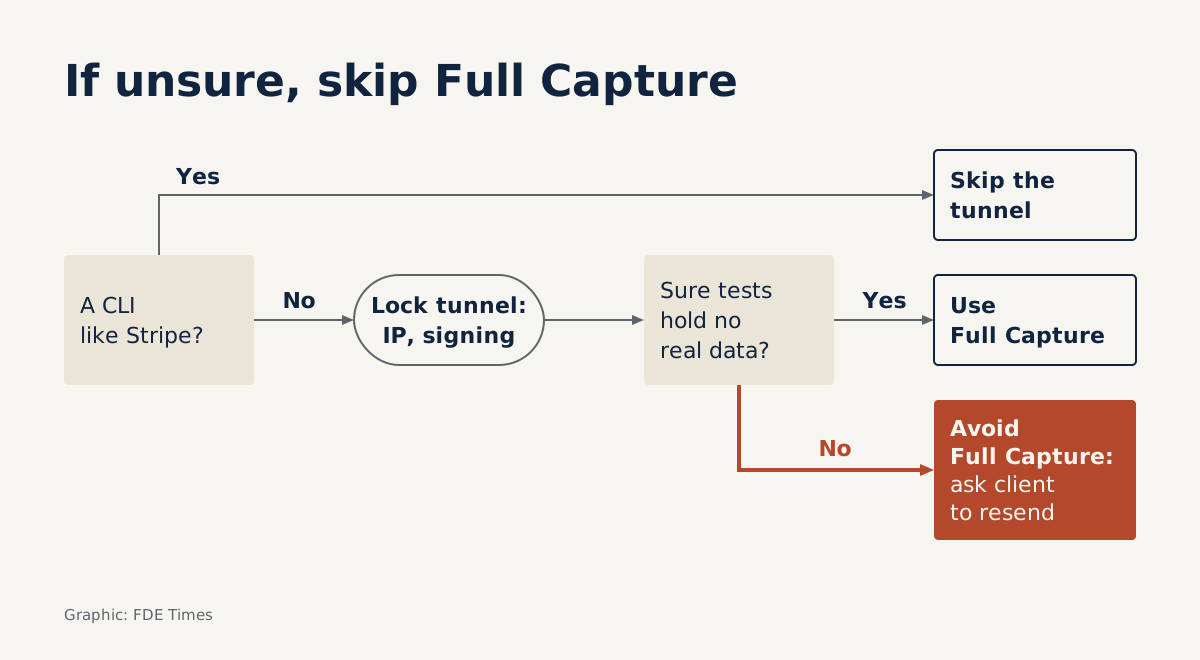
When you are debugging webhooks, replay is the ngrok feature you will want to switch on straight away: it resends a request you have already captured. It only works when the account has Full Capture enabled, a mode that stores every request and response in full. ngrok itself warns that you and your teammates may then have access to sensitive data.
For an FDE, that is not a configuration detail. A client’s webhooks usually carry the client’s real data, and the destination is a laptop you carry around.
You will meet this situation soon enough: the client’s system fires an event, your handler does not react, and their logs show one vague error line. A tunnel sends the request straight to the handler on your machine so you can inspect it on the spot instead of redeploying after every attempt, provided the limits are set from the start.
Do you really need a tunnel?
Stripe’s documentation presents ngrok as a way to create a temporary public HTTPS URL for a server on localhost, and says plainly that it is for testing. The same page offers an option that needs no tunnel: Stripe CLI forwards events to a local port and prints the signing secret.
stripe listen --forward-to localhost:4242/webhookSo the first question at a client is whether the webhook provider has a similar tool. No public URL means no public port to protect. Use ngrok when the sender can only call a URL, for instance when the client’s team keeps full control of the configuration and all you can do is give them an address.
A debugging session from start to finish
Picture this: the client uses Stripe, their team manages the test account themselves, and your handler runs at localhost:4242/webhook. You open a tunnel to port 4242, send the URL to the client and ask them to fire a test event. The request arrives, but the library reports an invalid signature.
Do not blame the secret yet. Stripe states that any change to the raw body makes verification fail, so a middleware that parses the JSON and serialises it again is enough to cause the error, even if the content looks identical. Check that the handler receives the exact original bytes, then compare secrets.
With that fixed, you set a breakpoint to look at the payload and stay there for 40 seconds. If the sender is GitHub, which requires a 2XX response within 10 seconds, you have overrun by 30 seconds and that delivery counts as a failure. A better approach is to return 2XX first, write the test payload to a file, and debug the processing logic against that file.
Timestamps can cost you time too. An event is signed at 10:00 and you resend it at 10:07. If the resent copy keeps the old timestamp, the 7-minute gap exceeds the Stripe library’s default tolerance of 5 minutes, and the request is rejected, exactly as the anti-replay design intends.
This is not a bug, so ask the client to fire a fresh event rather than hunting for a fault that does not exist.
When something breaks, narrow it down by symptom before you touch the code.
| Symptom | Suspect first | Do this first |
|---|---|---|
| Sender gets a 403, nothing in the laptop logs | verify-webhook blocking at the edge | Check the secret and timestamp settings in ngrok |
| An HTML page comes back instead of the handler’s response | The free plan’s interstitial page | Ask whether the client can add the bypass header |
| Request reaches the laptop but the signature is invalid | The body has been modified | Log the raw body before any middleware |
| Works the first time, rejected on resend | Expired timestamp | Create a new event |
The second row deserves a closer look. On the free plan, ngrok puts an interstitial page in front of HTML traffic in browsers to deter phishing, while API clients and webhooks can skip it with a header. Check early whether the client’s system lets you add headers, because this is easy to blame wrongly on the code.
A debug tunnel is still a public door
Stripe warns that without verification, an attacker can send forged events to trigger shipments, grant access or alter records. That risk does not disappear because the receiving end is a laptop. If your handler is connected to the client’s test environment, a forged event can still travel onwards into it.
Stripe recommends combining IP filtering with signature checks, and GitHub likewise recommends an IP allow list for the addresses it uses to deliver webhooks. On the ngrok side, the restrict-ips action allows or blocks traffic by source IP.
This action looks at the layer-4 address, not X-Forwarded-For, so a spoofed header will not get through. The trade-off is that the IP list must match whoever actually sends. In the case above the sender is Stripe, so you need the addresses Stripe uses to deliver webhooks; only when the client’s own system calls the tunnel directly do you need to ask them for their outbound IPs.
The second layer is the verify-webhook action, which checks the signature at ngrok’s edge and also checks the timestamp to prevent replays. Invalid requests get a 403 before they reach the laptop. Check the documentation to see whether the client’s webhook source is supported, and keep verification in the handler anyway, because that is the code that will go to production.
Do not pick a careless secret just because “it’s only debugging”. GitHub recommends a high-entropy random string, and that advice still holds when the receiver is a laptop behind a tunnel.
Remember too that the free plan has only one fixed dev domain, with no custom or reserved domains. That address therefore does not change after the debug session, so remove it from the client’s webhook configuration when you are done.
When should you turn on Full Capture?
Replay lets you repeat the exact request that caused the error, but it is not always usable. If the replayed copy keeps the old timestamp, the 10:07 case above happens again: past 5 minutes, the Stripe library rejects it. The feature is therefore most useful in the first few minutes after an event is signed.
To get it, you also have to store every body in full. For test events you generate yourself, that cost is close to nothing; for payloads containing a client’s real data, it is a different matter.
Before the session, ask the client whether the test events contain real data, and establish who in your ngrok account can see them. If the answer is unclear, leave Full Capture off; ask the client to fire the test event again each time you need to reproduce the error. It is a little slower but far easier to justify.
What to learn before taking it to a client
Do not start with ngrok. Start with how webhooks work: what the signature is computed over, why the raw body matters, how timestamps prevent replay, why the handler must respond quickly. Once you understand those, any tunnelling tool is just configuration.
For your career, this skill is easier to demonstrate than you might think. A CV line such as “debugged webhook integrations in client environments through a tunnel with IP filtering and signature verification, without storing real payloads” shows how you work, which a list of tool names cannot.
When a job description mentions integration or customer environments, be ready to walk through exactly one such case, with the limits you set and why.
A client may forget which tool you used to find the bug. They are less likely to forget that their data once sat on a laptop.
Was this article useful?
Thanks for the feedback!