Stop paying to stream 100GB a day through your API
Presigned URLs let users upload straight to storage while the app only decides who may do what, and a CDN serves the rest.
In brief
- Do not route large uploads and downloads through your app: issue presigned URLs or valet keys so the client talks to storage directly.
- Make tokens as narrow as possible: one file, one method, a short expiry, but long enough for large files, with a way to renew.
- Tokens cannot limit data size or number of uses, so check files after upload; for static content, allow public read, forbid writes, and put a CDN in front.
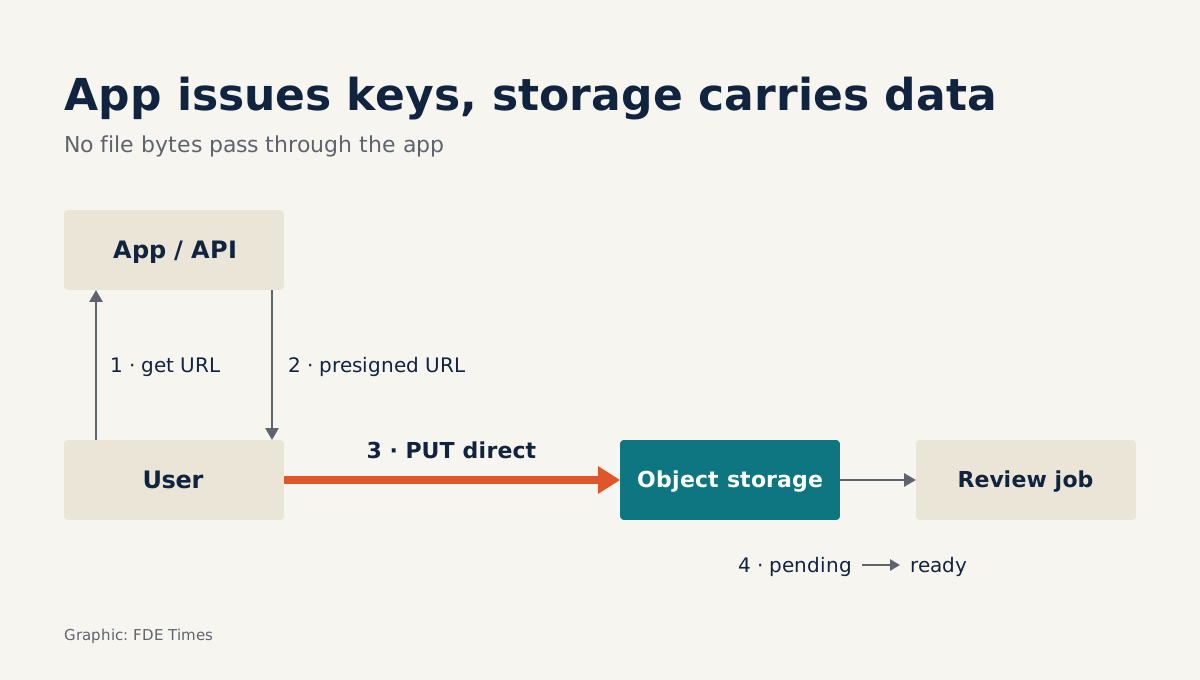
Imagine your customer has 200 field technicians, each of whom uploads a 500 MB inspection video at the end of the day. If every byte goes through your API, the application server has to take in and push out roughly 100 GB a day, just to do a job that storage can do on its own.
Microsoft’s Azure Architecture Center describes exactly this cost: when an application proxies uploads and downloads, it consumes valuable resources such as compute, memory and bandwidth. The valet key pattern hands the data transfer to the storage service, while the application keeps only the job of deciding who may do what.
For a Forward Deployed Engineer this request comes up again and again: the customer wants their users to push documents, images, logs or training data into the system you have just deployed. The guide below walks step by step through building that flow on your laptop, then putting a CDN in front of the static content.
What will you build, and what do you need first?
You will build three things: an endpoint that issues time-limited upload URLs, a flow in which the client uploads straight to storage, and a check that runs on each file after the upload finishes. The final part is storage for static content with a CDN in front of it.
You need a cloud account with object storage (S3 or Azure Blob), a small backend you are comfortable with, and curl. The code below is pseudocode, simplified to show structure rather than any particular SDK’s syntax; when you build it for real, look up the presigned URL function in your SDK.
Step 1: how narrow does the key need to be?
According to AWS documentation, a presigned URL is defined by four things: the bucket, the object key, the HTTP method and the expiry time. Whoever holds the URL can upload to exactly that object without any AWS credentials or permissions.
Microsoft defines the valet key in the same spirit: a time-limited token that applies only to a specific resource and only to predefined operations, for instance write but not read. Its sample restricts the token to one container and one file, with an expiry of about 3 minutes and only the create permission on the blob: no download, update or delete.
The rule that follows is that every dimension must be narrow. One file, one method, one time window, and no surplus permissions.
Step 2: write the endpoint that issues URLs
Microsoft uses a lightweight API running on Azure Functions to issue tokens. You can do the same with a route in your existing backend:
# Pseudocode, simplified for illustration
POST /uploads            (user is logged in)
  check that the user is allowed to upload for this tenant
  object_key = "uploads/{tenant_id}/{new_uuid}"
  url = presign(bucket="customer-uploads",
                key=object_key,
                method="PUT",
                expires_in=<computed in step 4>)
  save object_key to the DB with status "pending"
  return { url, object_key }
(In plain terms: a signed-in user calls the route; the server checks they may upload for this tenant, generates an object key from the tenant ID and a new UUID, presigns a PUT for that key with the expiry worked out in step 4, stores the key in the database with status “pending”, and returns the URL and key.)
The most important detail is that the server generates the object key; it is never taken from the file name the user sends. AWS notes that uploading with a presigned URL to a key that already exists overwrites the existing object. If the client can choose the key, it can choose someone else’s file to overwrite.
Check after this step: call the endpoint twice, and you should get two different object keys.
Step 3: the client uploads directly, the app stays out of the way
The client takes the URL and pushes the file straight to storage:
curl -X PUT --upload-file video.mp4 "$UPLOAD_URL"To test the scope, use the same URL for a GET with curl "$UPLOAD_URL". The method is part of the URL’s definition, so this request must be refused. If it succeeds, your key is broader than you think.
AWS calls a presigned URL a bearer token: whoever holds it has the access. So do not write full URLs into application logs, analytics or support tickets.
Step 4: how long an expiry is enough for large files?
Microsoft advises short expiry times to reduce the risk of a leaked token, but also warns that if they are too short, large uploads will fail, so you need a renewal mechanism. The 3 minutes in the sample suits small images, not every case.
Do the arithmetic. A 1.8 GB file on a real-world 10 Mbps uplink: 1.8 × 1024 × 8 = 14,745.6 megabits, divided by 10 gives about 1,475 seconds, or nearly 25 minutes. A 3-minute token is certain to fail. The sensible approach is to size the expiry for the customer’s largest file and slowest connection, plus a safety margin.
As for upper limits, AWS allows anything from 1 minute to 12 hours in the console, and up to 7 days with the CLI or SDK. There is a trap: if the URL is signed with temporary credentials, such as an IAM role session, it expires along with those credentials even if you set a longer expiry.
Large downloads have a different trap. According to AWS, S3 checks the expiry when the request arrives: a download already in progress continues after the URL expires, but if the connection drops and the client resumes after the expiry time, the request fails. The client should therefore know to ask your endpoint for a fresh URL rather than retrying a stale one forever.
That is why you add a renew route alongside the route from step 2. It does not generate a new key; it re-signs the same key, and only for the user who already owns it:
# Pseudocode, simplified for illustration
POST /uploads/{object_key}/renew   (user is logged in)
  look up object_key in the DB
  reject if it does not belong to this user
  reject if the status is not "pending"
  url = presign(bucket="customer-uploads",
                key=object_key,
                method="PUT",
                expires_in=<same as step 4>)
  return { url }
(In plain terms: look up the object key in the database, refuse if it does not belong to this user, refuse if its status is anything other than “pending”, presign a PUT for the same key with the step 4 expiry, and return the URL.)
Downloads work the same way: the client calls your endpoint again for a new GET URL for the same object, after the server checks read permission. Check after this step: let a URL expire, and a PUT should fail; call the renew route and PUT with the new URL, which should succeed, with the object key in the database unchanged.
Step 5: why do you still need to check files after upload?
This is the part many people skip. Microsoft states it plainly: it is usually not possible to create a key that limits the amount of data written, nor the number of times the key is used. A legitimate user can still upload a huge file, a file in the wrong format or a malicious file.
Hence the post-upload check: when a file lands in storage, a job reads object keys in the “pending” state, checks size and format and scans for malicious content, and only then moves them to “ready”. The renew route in step 4 relies on this status too: once a file is “ready”, no more write URLs are issued for it.
Microsoft also recommends monitoring costs to spot unusual growth in storage. On Azure, the create permission makes a token effectively single-use, which limits the damage if it leaks.
Common errors and fixes
| Symptom | Common cause | Fix |
|---|---|---|
SignatureDoesNotMatch |
Clock skew on the machine signing the URL | Sync with an NTP server; even a small skew can break the signature |
SignatureDoesNotMatch with the correct time |
A proxy in between modifies headers or the query string | Send the request directly to storage, not through a URL-rewriting proxy |
| Large uploads fail midway | Expiry too short for the file size | Size it for the largest file and use the renew route from step 4 |
| URL expires earlier than set | Signed with temporary credentials | Check the session duration of the role that signs the URL |
If the customer needs assurance that files are not corrupted in transit, AWS supports upload integrity checks using checksums in SigV4.
Step 6: what about static content, does it need a key?
Not every file needs a valet key. Microsoft’s Static Content Hosting pattern puts images, scripts and stylesheets directly on storage and adds a CDN in front to improve performance, at the price of extra cost. The container must allow public read but must never allow public write; content that needs protecting goes back to using a valet key.
A CDN, as Wikipedia defines it, is a geographically distributed network of proxy servers and data centres that brings content closer to users. The system-design-primer distinguishes two kinds: a pull CDN fetches content from the origin server when the first user requests it, so the first request is slower; a push CDN suits content that is rarely accessed or rarely updated.
The cost of a CDN, again according to system-design-primer, is money, content that can go stale if you update it before the TTL expires, and the need to change the URLs of static content. The practical fix is to put a version in the file name, for example app.v42.js: every deploy produces a new URL, so no old copy is left waiting for its TTL to run out.
Step 7: watch the CDN serve a stale copy, then fix it
This exercise is simplified and uses a pull CDN pointing at the static container you just created. First, check permissions: try writing a file directly into the container without any token. The request must be refused, just like the GET test in step 3.
# $CDN is the CDN domain pointing at the static container (simplified)
curl "$CDN/app.js"   # 1st request: the CDN has to fetch the file from the origin
curl "$CDN/app.js" # 2nd request: should be served from cache, faster($CDN is the CDN domain pointing at the static container. The first request makes the CDN fetch the file from the origin; the second should be served from cache, and faster.)
Now change the contents of app.js, upload it to storage under the same name, and request it again through the CDN. If the TTL has not expired, you will most likely still get the old version: this is exactly the stale content system-design-primer warns about.
Finally, upload the new version as app.v2.js and request that URL. You will get the new content immediately, because to the CDN this is a file it has never seen; the first request may be slower, just as described for a pull CDN. You pass the check when you can explain all three results.
What does this skill look like on a customer site?
On a customer site, the first question is usually not whether to use S3 or Blob but who is proxying the files. Open the application server’s logs and bandwidth charts: if upload traffic makes up most of it, you have a concrete, measurable proposal.
When reading FDE job descriptions, look for work involving receiving files or data from customers, with phrases such as “file ingestion” or “data onboarding”. If you see them, that is your cue to walk through this exact exercise in the interview.
On your CV, do not just write “used S3”. Write that you moved uploads to presigned URLs, chose token expiry based on real file sizes, added a renew route and introduced post-upload content checks.
The first thing to do in your first week with a customer: find the heaviest upload endpoint, measure how many bytes pass through the app each day, and bring that number, together with the presigned URL design above, to the next technical meeting.
Was this article useful?
Thanks for the feedback!
5 sources
- Valet Key pattern - Azure Architecture Center | Microsoft Learn · 2024-05-08
- Download and upload objects with presigned URLs - Amazon S3
- Static Content Hosting pattern - Azure Architecture Center | Microsoft Learn · 2022-07-28
- system-design-primer: Content delivery network
- Content delivery network - Wikipedia