When Streamlit falls short for clients, this free React course helps
Learn React offers more than 600 sandboxes that run in the browser, but engineers who know only Python should learn JavaScript first.
In brief
- Streamlit's own documentation suggests switching stacks once an app serves customers at scale.
- Learn React on react.dev is free, teaches Hooks from the start, needs no installation and has more than 600 sandboxes.
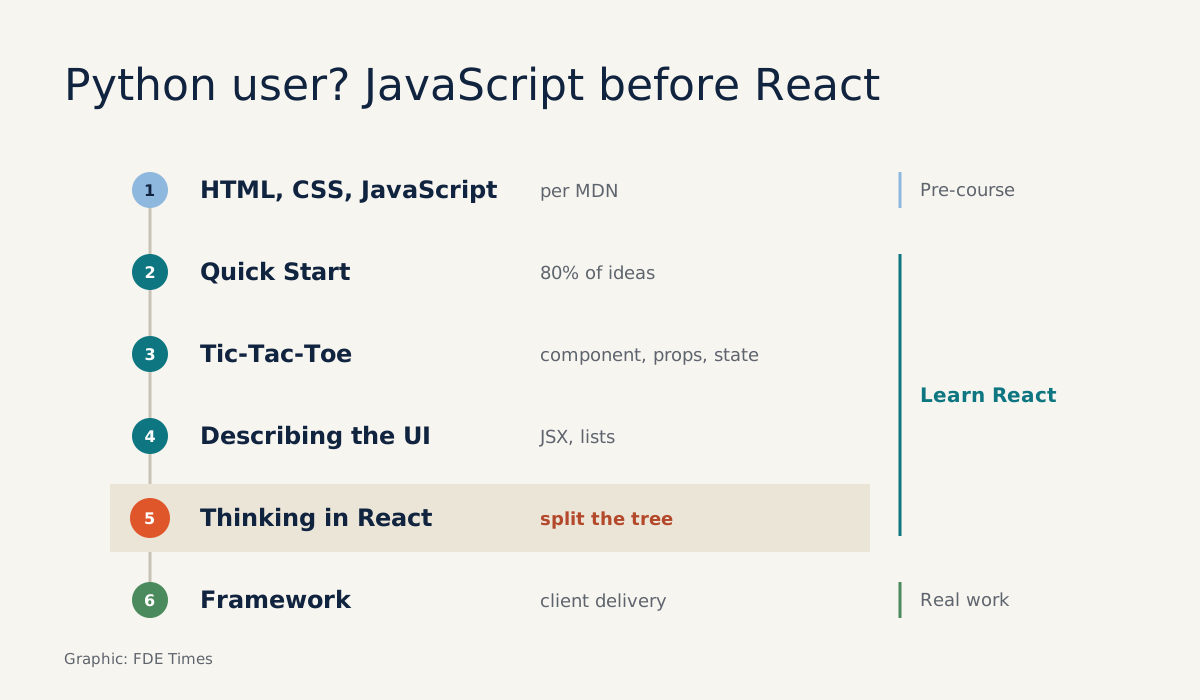
- Learn HTML, CSS and JavaScript first, then work through Quick Start, Tic-Tac-Toe and Thinking in React.
Streamlit’s official documentation says outright when users should move on: once an app is “serving customers at scale.” Streamlit positions itself for data apps, dashboards, internal tools and AI apps running on your own data. Custom interfaces built to a client’s specification are not on that list.
That is where many Python-first FDEs get stuck. The prototype works well in the demo, then the client wants to hand it to their own end users, and suddenly a real interface is needed. The Learn React course on react.dev is the cheapest way in. It is free and official, and rigorous enough that you can build your first screen yourself.
Who made the course, and what does it teach?
Learn React launched with the new react.dev site on March 16, 2023, introduced by Dan Abramov and Rachel Nabors of the React team. In the team’s words, it is a self-paced course that teaches React from scratch to people who know nothing about it. Unlike the old documentation, it teaches Hooks from the start, so you never learn class components only to abandon them.
Its greatest strength is interactivity. More than 600 sandboxes are scattered across the site, and most pages in the Learn section end with a few exercises to test yourself. The Installation page states plainly that nothing needs installing to get started: you just edit code in a sandbox.
For an engineer used to notebooks, that is a real advantage. You can study in the gap between two client calls instead of losing an afternoon to configuring Node.
What order should you take it in if you only know Python?
Do not jump straight into react.dev. MDN lists the prerequisites for learning React: familiarity with HTML, CSS, core JavaScript and the command line. If Python is all you have written, spend a few sessions filling that gap first, or you will trip over JavaScript before you ever reach React.
Then start with Quick Start at react.dev/learn. The page promises to introduce 80% of the React concepts you will use every day. Next comes the Tic-Tac-Toe tutorial, which assumes no prior React knowledge and teaches three fundamentals: components, props and state.
After that, read the “Describing the UI” chapter, where you learn to create, customize and conditionally display components, along with JSX, lists and purity. Only then move on to “Thinking in React”, the most valuable part for an FDE.
First idea: break down the interface before writing code
“Thinking in React” walks you through the thought process of building a searchable product data table. The lesson is organized into five steps, and step 1 is breaking the UI into a component tree. You then describe the states the screen can be in, and wire up the data flow.
Take a hypothetical case. A client wants a screen for viewing support tickets that your agent has already classified, with a search box and an “urgent tickets only” filter. Following the lesson, you sketch an outer frame holding a search bar and a ticket table, with the table in turn holding individual ticket rows, before typing a single line of code.
That sketch doubles as a customer discovery tool. Show it to the client and you will learn at once which fields they need to filter on, before you spend effort wiring up an API.
Second idea: state is what the client sees
Tic-Tac-Toe and “Thinking in React” both force you to answer one question: what states does this screen have? For the ticket board there are only two: the text typed into the search box, and whether the urgent filter is on or off. The displayed list is not state; it is derived from those two.
import { useState } from 'react';

function TicketBoard({ tickets }) {
  const [query, setQuery] = useState('');
  const [urgentOnly, setUrgentOnly] = useState(false);

  // The visible list is recomputed on every render, not stored as separate state
  const visible = tickets.filter(t =>
    t.title.toLowerCase().includes(query.toLowerCase()) &&
    (!urgentOnly || t.urgent)
  );

  return (
    <>
      <input value={query} onChange={e => setQuery(e.target.value)} />
      <label>
        <input
          type="checkbox"
          checked={urgentOnly}
          onChange={e => setUrgentOnly(e.target.checked)}
        />
        Urgent tickets only
      </label>
      <TicketTable tickets={visible} />
    </>
  );
}
Notice that there is no useState for visible. Store the filtered list as a third piece of state and sooner or later it will drift out of sync with the search box, and the client will see data that does not match what they just typed.
For anyone used to Python scripts that run top to bottom, this is the biggest shift in thinking. React makes you name each state explicitly and keep the number of states to a minimum, a habit worth having for any interface delivered to a client.
Third idea: real apps should start from a framework
The React documentation itself advises starting with a framework if you want to build a new app or website. Its reasoning is that building from scratch forces you to make your own decisions about routing and data fetching.
An easy mistake after finishing the sandboxes is to lift that code as is, assemble a build configuration around it yourself and hand it to the client. A one-screen demo still runs fine.
But when the client asks for a second page, or wants the ticket table to pull data straight from their API, you have to choose a routing approach and a data-fetching approach in the middle of the project, just when time is shortest.
So treat the sandbox as a place to learn, and build the version you deliver on a framework from the first commit. The boring problems already have solutions, and your time goes into the logic specific to the client.
Before opening the repo, write one line in the technical document: which framework, and why. When the client asks, you will already have the answer.
Who should take it, and how should it appear on a CV?
The course suits backend, data or ML engineers who work as FDEs or want to become one, and who feel dependent on someone else whenever they need a screen. It will not make you a frontend expert, but it is enough to let you deliver a prototype with a polished interface on your own.
When reading FDE job postings, look for lines such as “build prototypes for customers” or “full-stack.” The best proof is a small repo: take a Streamlit dashboard you have built, rebuild the client-facing part in React, and explain in the README why you split the components the way you did.
The course is free and already sitting in your browser. What is missing is a real client screen to practice on.
Was this article useful?
Thanks for the feedback!